
Animals, Plants, & Nature Week

Poppies in the Blue
Daily Deviation 7/8/2015
Daily Deviation 7/8/2015
Hello! My name is Ruth, though I am commonly known as kayaksailor on DeviantArt. I have been a photographer for most of my life, adding up to more than a half century of taking photos!
 I made the official switch from film to digital in May 2007 (about the same time as I joined DA) after getting my first dSLR, a Nikon D100, at a yard sale. As I am rather fond of flower gardens and the accompanying insects, those are my primary subjects and will be my examples for this article. Personal taste will dictate your scenes! Today's article will discuss some Depth of Field tips for Close-up flower photography!
First of all... What is a Close-up Photograph?
We will begin with two simple definitions of what Close-Up photography is:
- A photograph taken at close range or with a long focal-length lens.
- An intimate or detailed view.

So... What is the Difference Between
Close-up and Macro Photography?
Many people equate Macro photography with Close-up photos. There are certainly similarities--as the photographer, you may be near the subject and the image may show tiny details--but the biggest difference comes down to the the ratio between the subject's actual size and how it is represented on the image.
A Macro photograph is one in which there is a 1:1 ratio or greater between the size of the subject on your camera's sensor and the size of the subject in real life. If the size of the subject on your camera's sensor is smaller than the size of the subject in real life, you have a Close-up photograph. For many people the two terms are used interchangeably but having an understanding of the differences is important for categorizing on DA!
To me, the intent is to get the feeling of being IN the image.

When it comes to Close-up photography, there are no hard and fast rules to which lens you use or exactly how close you have to be. But be prepared to get your knees dirty, maybe even your elbows and stomach too!


Tip: I tend to use my zoom lenses, 28mm-300mm & 150mm-600mm, primarily due to the way they foreshorten objects and make the subjects feel closer than in reality.

Tip: A tripod is helpful, but not always necessary. If you do use one make sure it allows you to get close to the ground, depending on your subject.
Ok, I'm ready to learn what Depth of Field is!
An understanding of depth of field (DoF)–-how much of your photograph is in focus–-is helpful. Depth of field is controlled by your camera's aperture and the aperture on your camera is represented by f-stop numbers. Remember: As you change your f-stop you'll also need to adjust your shutter speed and ISO to compensate. I tend to shoot in aperture priority mode.
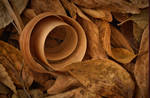
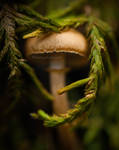
Shallow DoF
A shallow depth of field can be achieved by shooting with a large aperture (a lower f-stop number). With these smaller f-stop values, your lens has a larger opening, allowing more light into the camera. This allows the camera to focus more fully on your subject and leave the surrounding elements blurry. This helps to single out your subject (creating a point of interest) while at the same time reducing the effect of distracting background clutter:


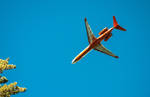
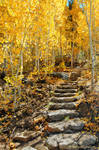
Deep DoF
A deep depth of field can be achieved by shooting with a small aperture (a high f-stop number). With these larger f-stop values, your lens has a smaller opening which restricts the amount of light entering the camera and causes your camera to capture the foreground and background in focus. This technique is not used as often in Close-up photography but is seen more often when shooting scenery:

Experiment with a variety of f-stop depths to find what you like. Most mid-range to professional dSLR cameras have an f-stop “preview” button.
Tip: By pushing the button you manually close the aperture leaves down in your lens and you can see what will be in focus.
When choosing an f-stop, it is important to think about your subject and what you want to emphasize. If it is an insect, it is important to have the eyes in focus – a general choice. So you'll need to be aware of the depth of your focal plane; how deep the area in focus needs to be to capture all the details you want. Flowers are more forgiving so you can get a narrow band for a bit more of an abstract look.

And that's where the experimentation comes in! My biggest tip for Close-up Photography:
Don't be afraid to take the same image with varying f-stops.
You may have an image in mind when you set out to capture a scene Close-up, but by trying different f-stops you may discover a photograph that truly delights you.